+84 862 765 053
Lash extensions have revolutionized the beauty industry, providing individuals with stunning, expressive eyes. One crucial aspect of achieving this perfection is lash mapping. In this guide, we delve into the intricate art of eyelash mapping, focusing on various mapping techniques and their suitability for different eye shapes and preferences.
Understanding Lash Mapping
Lash mapping is a method to strategically decide the sizes, shapes, and thicknesses of eyelash extensions for achieving the desired style and drama while considering the client’s eye shape and natural lashes.
What You’ll Need for Lash Mapping
Items required for lash mapping include eyeliner or pencil for initial skin mapping, gel pads to cover lower lashes during the process, a colored pen (such as red for optimal contrast) for marking on the gel pad, and an assortment of lash extensions in different lengths and curls.
What to pay attention to when doing lash mapping
Several factors need to be considered when engaging in lash mapping to ensure optimal results and client satisfaction.
Client’s Eye Shape
The natural shape and structure of the client’s eyes play a significant role in lash mapping. Every eye shape is unique, and understanding the client’s eye shape allows the technician to tailor the lash design to enhance their natural features. Factors such as eye size, lid space, and the presence of any asymmetry need to be carefully assessed to create a balanced and harmonious lash look.
Understanding the client’s eye shape is crucial for effective lash mapping. Here’s a brief guide on mapping for different eye shapes:
>> Learn more about your eye shape and how to determine it correctly in the article: How To Determine Eye Shapes – We Got Your Back
Considering Eye Spacing
Eye spacing, whether close-set or wide-set, presents distinct mapping considerations. Close-set eyes have a narrower gap between them than the width of an eye. To visually widen this gap, longer lash lengths should be applied towards the outer corners. However, it’s essential to avoid creating a doll-like effect, which could inadvertently emphasize the proximity of the eyes.
Conversely, wide-set eyes have a more significant gap, more than the width of an eye, between them. For wide-set eyes, employing doll or open-eye mapping is ideal, enhancing the overall appearance of the eyes without excessive elongation.
Client’s Preferences
The client’s preferences and desired outcome are essential considerations in lash mapping. Some clients may prefer a more natural look, while others may desire dramatic volume and length. It’s crucial for the technician to communicate effectively with the client to understand their expectations and aesthetic preferences, ensuring that the lash mapping reflects their desired outcome.
>> How good eyelash extension consultation can impress your clients
Condition and health of the client’s natural lashes
Overloading the natural lashes with extensions that are too long or heavy can cause damage and lead to premature shedding. By assessing the strength and integrity of the natural lashes, the technician can determine the appropriate length, thickness, and curl of the extensions to maintain the health of the natural lashes while achieving the desired look.
Detail and precision
The technician must consider factors such as lash length, thickness, curl, and placement to create a symmetrical and cohesive lash design. Consistency in mapping ensures that the final result is uniform and balanced, enhancing the overall appearance of the eyes.
Client’s Face Shapes
The client’s face shape is a pivotal factor in determining the most suitable mapping style. Aligning the mapping technique with the face shape ensures a seamless and flattering aesthetic. Wide faces can elegantly carry more dramatic lash looks. Styles like the cat eye or natural mapping complement the broader features, providing a captivating effect. Conversely, for narrower faces, opting for doll eye, open eye, or natural mapping is recommended. These styles achieve a balanced and appealing effect without overwhelming the facial contours.
>> Learning Different Face Shapes Never Gets Old Thanks To This!
How to Make a Lash Map
1. Lash mapping on the skin
Tell your customer to sit up straight, look forward with their eyes open, and avoid following your hand movements. You won’t be able to acquire a good picture of your client’s facial characteristics if you try this when they are lying down.
Place dots over the desired location of the longest lashes while the client’s eyes are open. Put them in the vicinity of the eyebrows or, if the eyelids and lashes were cleaned before mapping, in the vicinity of the lash line. Depending on the style you select, you can mark the locations of the various sections with many dots.
2. Put on eye pads
Place the gel pads gently over the lower lashes while your client’s eyes are open. Remember that you are dealing with eyes, so use gentle pressure to ensure the pads stay in place. Maintain eye pads 1-2 mm or more away from the waterline.
3. Lash mapping on the gel pads
Your client should close their eyes at this point. Draw exactly the same lines in the same colors that you did on the gel pad’s skin with your colored pen. When your client has closed eyelids, you may notice that the dots no longer seem to be in the correct places; for instance, the middle of the lash line may not appear to be at the same point. Stick with the dot locations, though, because the appearance of the object with the eyes open is what matters.
To plan which extensions to put where, draw lines on the gel pad. The space must be divided into five, six, or even more portions, based on your personal preference. Note down each section’s length and, if desired, the curls, adhering to the style you have selected to best fit your customer.
Exploring Popular Lash Mappings
1. Natural Lash Map
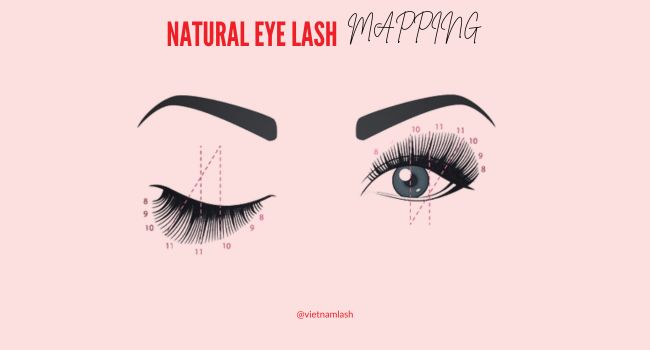
The natural eye mapping mimics the natural lash growth, offering a subtle, elegant look. Ideal for almond, round, and upturned eyes, it gradually varies lash lengths, ensuring a seamless blend. It starts with shorter lengths in the inner corners, gradually increasing towards the outer corners.
This technique is highly versatile, allowing for a customized approach based on the client’s desired effect, whether it’s a slightly upturned look or a more pronounced almond eye shape.
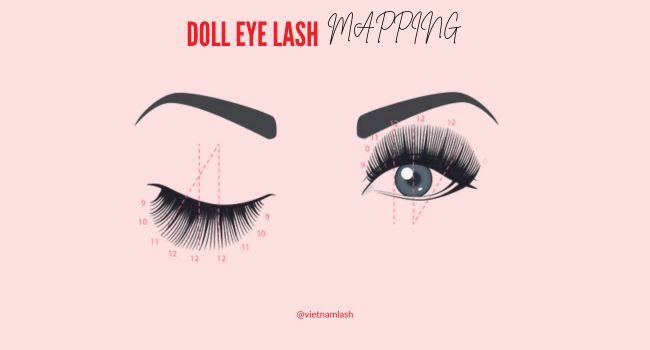
2. Doll/Open Eye Lash Map
Doll/open eye mapping involves placing the longest extensions over the iris, using straight lines. The lengths then dramatically drop down on the inner and outer corners, creating the appearance of larger, more open eyes. This mapping is particularly suitable for almond, monolid, and downturned eyes.
By strategically applying longer extensions over the iris, this mapping style can transform the eyes, making them appear more awake and youthful. Doll eye eyelash extensions map is a go-to choice for clients seeking a wide-eyed effect.
3. Kitten Eye Lash Map
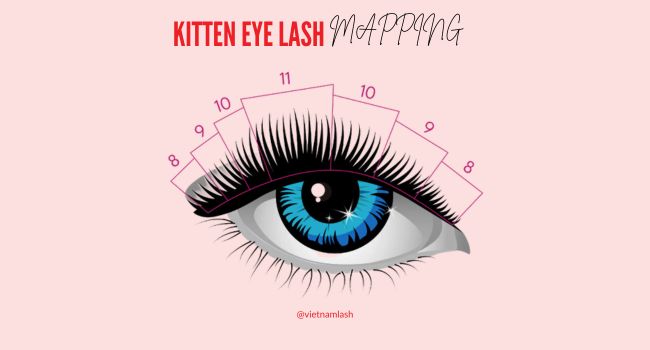
The kitten lash map is designed to add a subtle flare to the eyes. It begins with shorter lengths, staying consistent until reaching the pupil or center of the eye. From there, the lengths drastically jump up, reaching their peak towards the outer 3-5 mm of the eyelid. Finally, the lengths drop down dramatically, achieving a captivating and balanced look.
This mapping style is perfect for downturned or droopy-eyed clients, as it helps lift the eyes and create a more youthful, alert appearance.
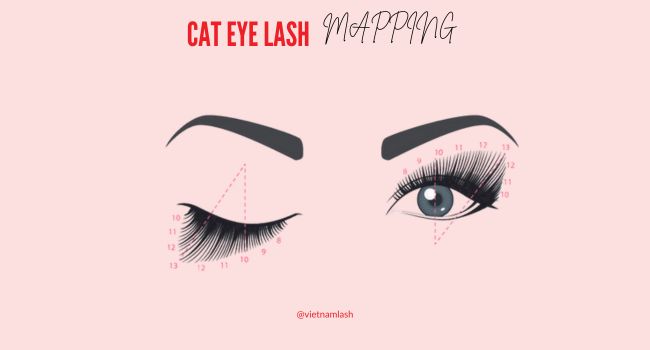
4. Cat Eye Lash Map
Cat eye mapping is characterized by shorter lengths in the inner corners that gradually increase as they extend towards the outer corners. This dramatic lengthening towards the outer corners creates the illusion of wider, more pronounced eyes.
Ideal for clients with close-set eyes, this mapping style opens up the eyes and adds a touch of glamor, enhancing their overall allure.
5. Dramatic Eye Lash Map
Dramatic eye mapping places the longest extensions under the arch of the brow, adding a bold and striking effect, particularly suitable for downturned eyes. By emphasizing length towards the upper brow area, it offers a unique, eye-lifting effect.
This mapping style is a favorite among those seeking a dramatic and intense look, making a statement with their lashes.
Conclusion
Lash mapping is an art that requires precision, expertise, and a deep understanding of the client’s unique features. By carefully tailoring lash extensions to eye shapes, angles, spacing, and face shapes, you can create a mesmerizing look that enhances your client’s natural beauty. Always prioritize understanding your client’s preferences and guiding them towards the most flattering lash mapping option.
Visit our website www.vietnamlash.com to discover a world of fascinating insights and explore a wide array of lash products tailored to suit every mapping style!