+84 862 765 053
Lash isolation not only allows you to have a stunning look but also maintains natural lash health. Although it is quite tricky, every tip you learn today is essential for your future.
No famous lash artist can be successful without experiencing lash isolation. We understand how difficult it is to learn, but lash isolation is a vital part of your lash career. Many lash extension programs require you to finish the Classic Eyelash Certification before learning further since this certification includes the basic technique of lash isolation.
Hence, to help you know more about lash isolation and bring you 101 tips and tricks to improve your lash isolation skills, this article is written. Your skills will be honed excellently after this post, so don’t be despondent!
What is Lash Isolation?
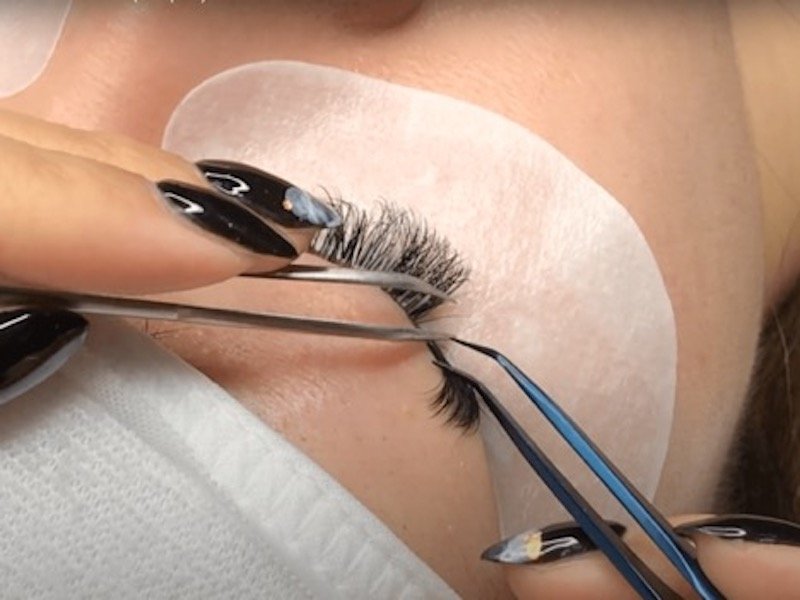
Lash isolation is a crucial technique in lash extension application. It involves the careful separation of each natural lash from the surrounding lashes before attaching an extension. This ensures that each extension is bonded to a single natural lash, preventing them from sticking together and creating a clumpy or unnatural look. Proper lash isolation requires precision and patience to achieve a seamless and beautiful result.
By mastering this technique, lash artists can ensure that each extension is attached to an individual natural lash, resulting in a more uniform, fuller, and flattering look for their clients.
The Benefits Of Proper Lash Isolation Skills
Understanding the benefits lash isolation offers you is a good motivation for you. Here are several crucial advantages you need to know:
Allows Natural Lashes Grow Healthy
Lash isolation is a critical step in maintaining the health of your natural lashes when applying eyelash extensions.
When eyelash extensions are attached, it’s important to isolate each individual natural lash properly. If this isn’t done correctly, multiple natural lashes can end up sticking together. This can lead to various problems:
-
Damage to Natural Lashes: When multiple lashes are stuck together, the natural lash that is close to falling out may be pulled out prematurely by the weight or tension from the adjacent lashes. This can damage the hair follicle and cause discomfort or pain for your clients.
-
Bald Spots: Continuous pulling and damage to the hair follicle over time can result in bald spots where the lashes no longer grow back properly.
-
Clumpy Lashes: Clumps of lashes can obstruct the client’s vision, making it uncomfortable and inconvenient.
Control The Shape Design
As we mentioned, natural lashes have different sizes and lengths, hence, if you skip lash isolation, the result can mess up the thorough eyelash extension design. Not all original lashes are straight and uniform, lash isolation will support you in choosing the right shape and size of lash extensions for natural lashes.
Ensure Your Clients Are Comfortable While Wearing Extensions
Lash isolation is a key to successful lash extensions and healthy natural lashes. If eyelashes are isolated and attached correctly, your clients will not feel them. In case the lashes are stuck together, they will feel tightness and tugging on the eyelid, which may even be painful. At the very least, they can find it annoying.
How To Isolate Lashes Like a Pro
Are you curious about how many lash isolation techniques there are? Let us introduce to you 4 techniques you can use to separate lashes like a professional.
1. Use A Guide Lash
The natural lashes keep getting tangled, and you cannot have a visible view to see all the lashes. You can use a guide lash to get it out of your way. You will attach a 0.07mm lash extension to the natural lashes. This lash will help you differentiate the shorter lashes to lengthen them so that you can hold them to the side with a lash tweezer.
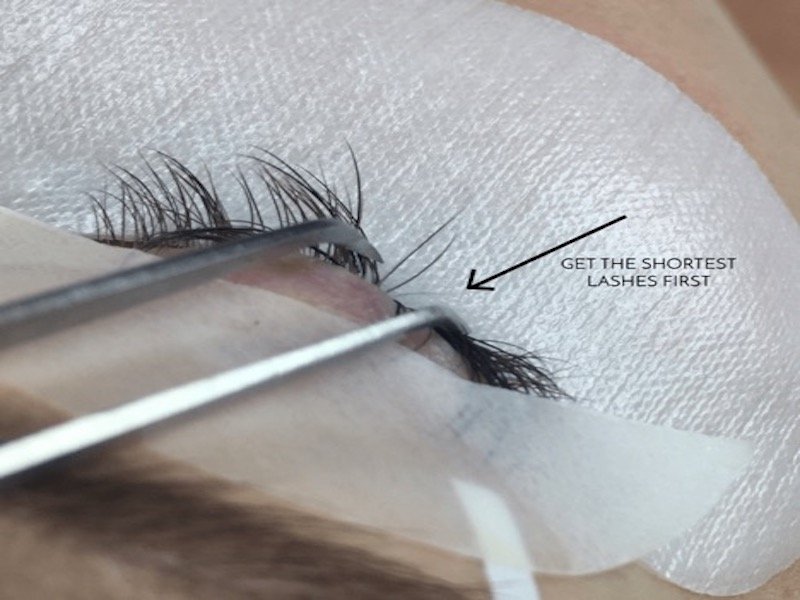
These natural lashes are short and thin, so the guide lash extension cannot last long. However, it can last during the eyelash extension application and help to finish the procedure excellently.
2. Pick The Right Pair Of Tweezers For Eyelash Isolation
A good pair of tweezers will complete your eyelash application process. If you pick the wrong tweezers, you cannot achieve excellent results, so please pay extra attention to them. You need to grip or ungrip endlessly during the lash isolation. These motions should be delicate to avoid damaging lashes.
>> Our store offers a selection of tweezers to help you isolate lashes with precision and ease: Isolation Tweezers
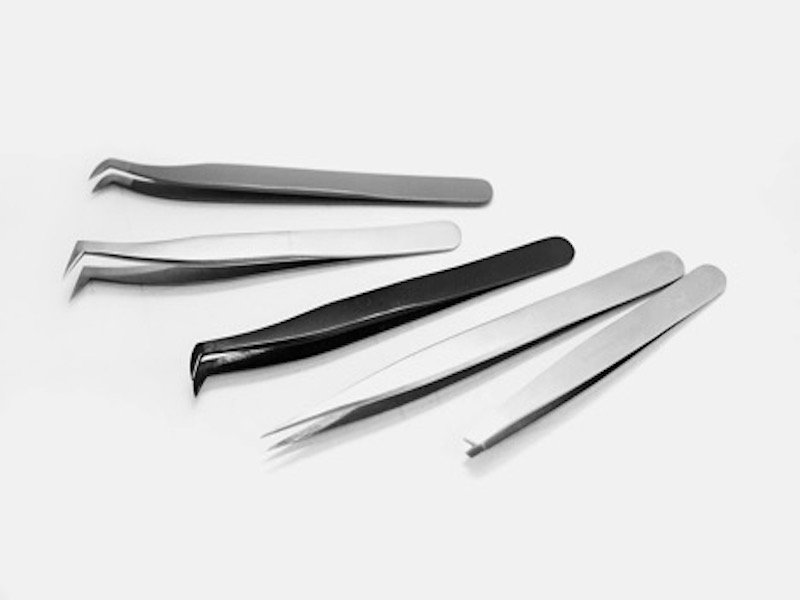
Holding tweezers for a long time can tire your hands; hence, we recommend you choose lightweight tweezers which don’t require too much tension to grip. There are 3 main kinds of isolation tweezers: hooked, straight, and curved. You can select the suitable ones based on your preference, but we suggest you use a hooked and angled tweezer.
Thanks to the smart design, it can approach hard-to-reach areas and be easy on the hand. However, selecting the best tweezers is a game, you can try as many tweezers as possible to find the right one. Never opt for the one with a flimsy design and a cheap price.
To learn more about how to maneuver these tweezers, check out:
How to Hold Tweezers for Eyelash Extensions
3. Tape
You can use under eye tapes for multiple purposes besides holding down lashes. Let’s see several ways of using tapes to simplify your isolation process:
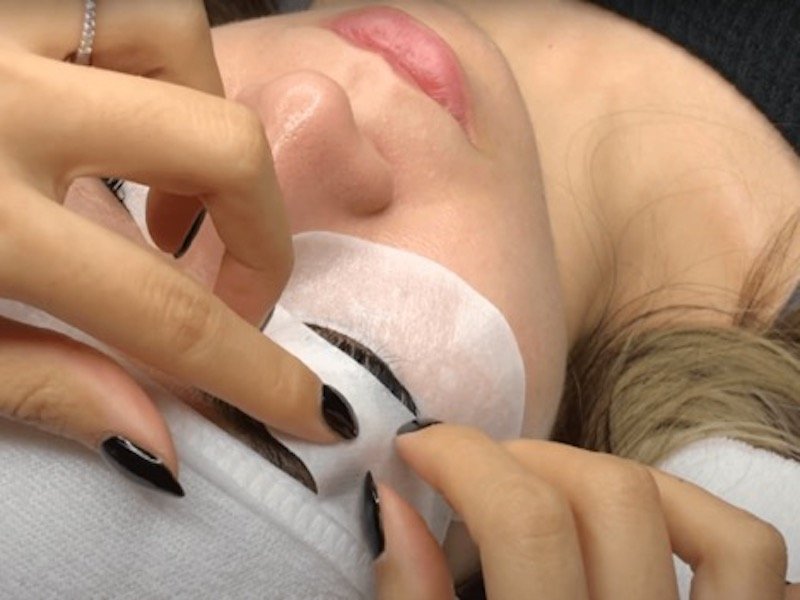
- Pull lashes up off the eye pads: You can glue the tape vertically to the center to lift the flat laying eyelash up. If you want to elevate the lashes slightly, you can place tape on the outer eyelid. The lashes will not touch the pad anymore, but you should use a lash mirror and check to ensure the eyelid is not lifted open. If not, the fume can penetrate and cause eye irritation or pink eye.
- Expose the inner lashes: This will help you expose the tricky inner lashes by adhering the tape horizontally to the inner eyelid and pulling it outwards gently, then securing it to the skin. It can help you cut off 20 minutes during the treatments.
- The tape-up approach: You can prepare a tape longer than the eye’s length. Next, you need to catch ⅓-½ of eyelash extensions horizontally onto the tape. After that, you can glue the tape flat against the eyelid. With this trick, you will pop the sneaky lashes right out, and little if any isolation is needed. You can use this method for eyelash fills and the completion of a full set.
- Pull up the skin on mature clients or hooded eyes: If you work on mature customers or hooded eyes, you can use the tape to pull up the skin and expose more of the base of the lashes since they tend to have extra skin around their eyes. If you don’t use tape, it will be harder to isolate the lashes. You can also divide tape into sections to focus on certain areas or extension layers.
4. Work Layer By Layer
As you know, natural lashes grow in layers, almost all of us have 2-3 vertical layers, and for someone with dense hair, the lashes are composed of up to 5 layers. If isolating lashes horizontally is hard for you, you can try to isolate lashes vertically.
This technique is really helpful for volume lash extensions. The process will be more straightforward when you separate one layer of lashes at a time with tape. Here is a comprehensive guide for working layer by layer.
Step 1: You need to prepare a tape that is longer than the eyes’ width. The tape will help you hold the lashes to prevent them from sticking together. To avoid the tape pulling the lashes, you should place 1 more layer of tape facing towards the glue part.
In case the lashes are too short, you should leave a bit of adhesive area exposed so that the baby lashes can stick to it and be pulled up.
Step 2: The lashes are held up with the tap. Then, use your isolation tweezer to release one layer from the glued area. Be careful, and do it accurately.
Step 3: You will attach eyelash extensions to the released natural lashes and continue doing so layer by layer until you have placed all eyelash extensions on all layers of lashes.
5. Double Handed
As its name implies, you need to use both hands to do this lash isolation technique. At first, it may be tough since you will use your non-dominant hand and dominant hand to keep natural lashes independent.
A tip for you is to hold the isolation tweezers in your non-dominant hand and separate lashes until you can keep only one lash in between the tweezers. Then, you will place eyelash extensions in that position with the tweezer in your dominant hand.
6. Use Your Fingers
You will use your 3 fingers to hold the isolation tweezer: your thumb, index finger, and middle finger. Besides, you can place your pinky, ring finger, and pads of your hands on the forehead for a supportive effect. Once you apply this tip, your hand and wrists will not be fatigued anymore, and you will hold and use tweezers stably.
A Few more Tips And Tricks for the Perfect Lash Isolation Techniques
To help you become a master of lash isolation skills, we will provide you with a few more tips and tricks. Here are a few:
1. Practice And Patience
Rome wasn’t built in a day, and neither are perfect lash isolation skills.
Be patient with yourself and allow time for practice and refinement. Start by working on mannequin heads or practicing with friends and family before taking on paying clients.
However, it will be better if you can have your friends act as models. You can give them a demi-set and apply extensions to other lashes. You should understand more about the lash texture and flexibility of natural lashes so that you can identify various lash types and choose the right diameters and lengths of extensions for them.
Besides, you can experience real challenges: the eyes twitch and move around when working on a real model. A friendly reminder for you: never give up when you just start trying. You can set a time limit and follow it strictly, this will encourage you to break through your limits. With dedication and perseverance, you’ll see improvement over time.
Read more:
2. The Glue Have To Dry Completely
The main reason why the lashes clump and stick together is that the adhesive is still wet. Your lash extensions will become a mess, your effort will become nonsense, and your clients will not be happy.
To avoid this situation, you need to give the glue time to dry completely and ensure the lashes adhere firmly before moving on to the next lashes. If not, the lash extensions will fall out soon. You should hold the extensions in place for a few seconds after they have been glued and release them from the tweezers slowly.
Moreover, to ensure the lashes are separate from each other, you can go back and forth between the eyes. That means you will attach a lash extension to the left eye and move onto the right.
Another way is to work by placing lashes in the center lines instead of working in one direction. If you attach extensions in 1 direction, it can disturb the eyelash extensions that are in the drying process.
>> Enhance your knowledge with expert tips on the proper drying techniques for lash extensions, shared by our seasoned professionals: How to dry eyelash extensions?
3. Apply Proper Pressure
Depending on the textures and lengths of lashes, you can apply different levels of pressure to isolate lashes. If you face the lashes, which are simple to separate and sit off the pads, you just need to use a lightweight or normal pressure.
In some cases, the lashes are tough to lay flat against the eye pads even when you have taped them up, so you need to use extra pressure. It will help you push the eye pad down and let the flat-laying lash pop up. This is just enough for you to have a visible view and allow you to glue the original lashes to the eye pad without adhering them to the eye pad.
Never try to apply hard pressure if you don’t want the eye to open and cause a slight slip. The outcome can be dangerous.
Conclusion
In conclusion, mastering lash isolation is a journey that requires dedication, practice, and a willingness to learn. By investing in quality tools, perfecting your technique, and staying inspired, you can rapidly improve your lash isolation skills and elevate your craft to new heights. So go ahead, unleash your creativity, and create stunning lash extensions that leave your clients feeling confident and beautiful.
Hey there, lash artists! Looking to take your lash expert to the next level? Discover a world of premium lash supplies and tools at Vietnamlash’s website. Whether you’re a seasoned professional or an aspiring artist, our range of products is meticulously crafted to help you refine your technique and elevate your artistry. Don’t delay – visit vietnamlash today and unlock the potential to create breathtaking lash extensions that exude confidence and beauty for your clients.