Hey, lash lovers! Welcome to the lash lounge, where we’re about to embark on a journey to demystify the art of crafting the perfect volume lash fan. If you’ve ever found yourself marveling at those Instagram-worthy lash sets and wondering, ‘how to make lash fans?’—you’re in the right place.
Whether you’re a lash artist seeking to refine your technique or a passionate DIYer ready to unleash your inner lash magician, this blog post is your backstage pass on how to make fan lashes. We’ll be delving into the nitty-gritty details, from choosing the right lashes and adhesives to mastering the fanning technique that will make your lash game strong.
So, grab your favorite lash tools, cozy up, and let’s dive into how to make lash fans together. Ready, set, lash!

What characteristics make an ideal volume lash fan?
The initial factor to consider when learning how to make lash fans is symmetry, specifically the uniform spacing between each lash. It’s essential to recognize that the space between lashes varies depending on the fan size. For instance, a 2D fan will have a wider space between lashes, while a 3D fan will have a slightly smaller space, and a 4D fan will be even smaller.
The spacing between lashes in a fan indicates whether it’s narrow, normal, or wide. An asymmetrical fan opening can lead to a misaligned or closed fan, which is a concern for lash technicians. In a scenario like creating a 5D lash look, having three closed lashes in the fan can disrupt the symmetry and result in an uneven finish.
Moving on to the next element, the body of the fan should constitute two-thirds of the fan, while the base should make up about one-third. It’s crucial to taper the base of the fan to prevent splitting, inadequate attachment, and discomfort for the client.
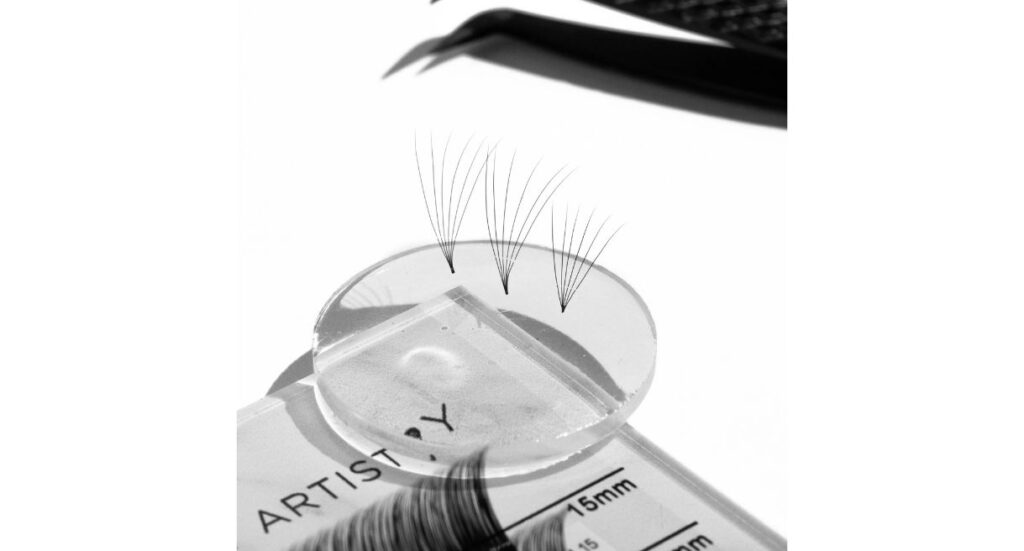
The glue zone, situated at the base of the fan, is another vital aspect of creating the perfect fan. This 2mm section of the base should be dipped into the glue to ensure proper adhesion. Using less than 2mm of glue can lead to retention issues.
Lastly, in volume lashing technique, it’s important to select the lash thickness based on the client’s natural lashes to avoid damaging them with heavy or oversized fans.
And remember, each client needs a customized lash fan. Just like we tailor everything to suit our client’s preferences and natural lashes, the same applies to creating volume lash fans. There are various sizes and styles of volume fans, and it’s a collaborative decision between you and your client to choose the best one.
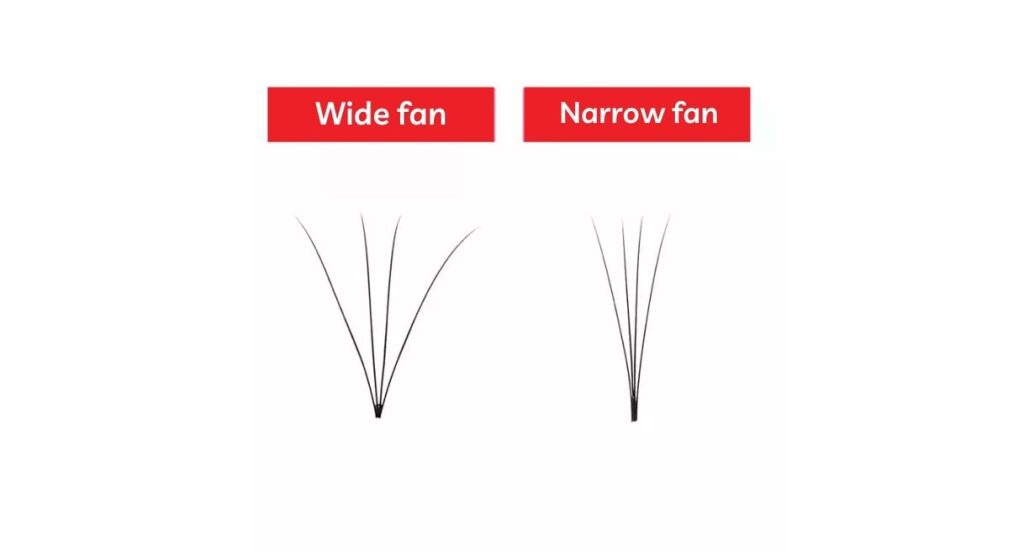
How to Make Lash Fans: Wide fan vs. Narrow fan
Consider the choice between a wide fan and a narrow fan. If your client prefers a light and fluffy look, opt for a wide fan. These fans are less dense, resulting in shorter and less impactful lashes. It’s crucial to communicate this to your client beforehand. When working with wide fans, be mindful not to leave the stem too short, as it can affect retention.
Ensure that the overall width of the fan doesn’t exceed 6mm (¼ inch). Fans wider than this can appear messy and make the application more challenging.
What are the different volume lashing techniques out there?
When it comes to crafting the ideal fan, you’ve got a bunch of lash fanning techniques to pick from! Just like when you’re learning anything new, it’s cool to experiment a bit and see which fanning technique suits you best. We’ll show you the different techniques on how to make lash fans to nail those perfect fans for your clients!
How to Make Lash Fans by Hand
1. Pinch Method
The pinching method involves lifting your lash cluster fully off the strip and pinching the bottoms together with your fingers at the root. It may seem straightforward, but there’s a bit of technical finesse involved to ensure you don’t end up with twisted lash bases.
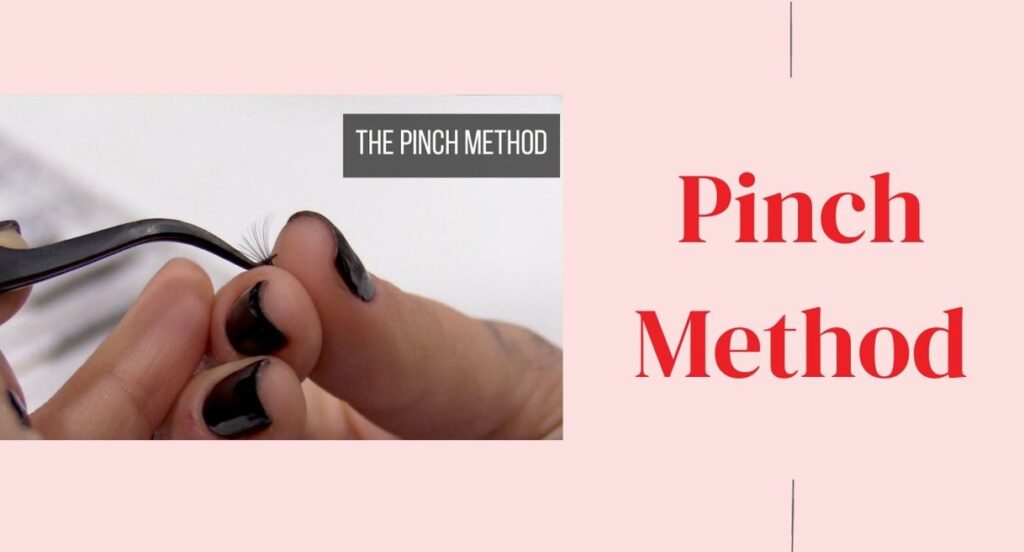
Step 1: Start by selecting the lashes you want from the strip and holding them between your thumb and index finger at the first knuckle, using tweezers for support.
Step 2: As you secure the lash base between your fingers, gently release the tweezers’ grip and simultaneously pinch the base with your thumb. It’s crucial not to roll the base to prevent twisting.
If you need to widen the fan, wiggle with your tweezers while maintaining the pinch with your thumb and forefinger.
Step 3: Once you achieve the ideal fan, firmly grasp it with your tweezers, dip it in glue, and attach it to the natural lash.
While this technique may be challenging, mastering it is highly rewarding, making it worth a try. The pinch method is specialized for mega volume technique with 30-35D lash fans.
2. Flowering Ring Method
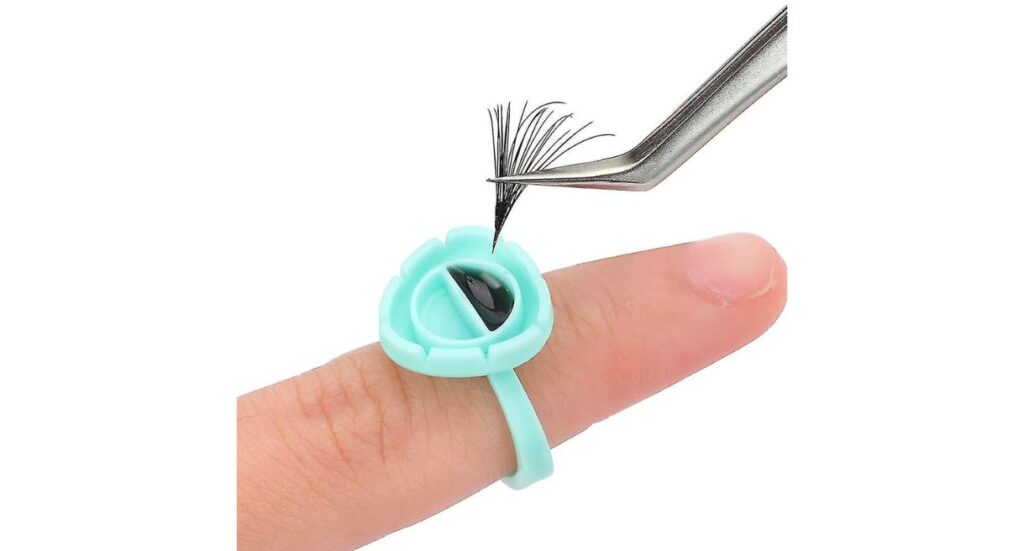
Step 1: Gently Pull Lashes Downward
To kickstart the flowering process, delicately pull lashes downward off the adhesive strip. This ensures that each lash is separated, setting the stage for a beautifully fanned out look.
Step 2: Dip the Base into the Glue
Once the lashes are separated, it’s time to dip the base into the glue.
Step 3: Slide and Shimmy in the Ridge of the Flower Ring
This step requires finesse and precision. Slide the lashes into the ridge of the flower ring, maneuvering them until you achieve the perfect fan. The flower ring serves as a guide, helping you create a symmetrical and well-balanced lash fan. As you slide and shimmy, remember to loosen the tweezer lightly; this subtle adjustment ensures a natural and effortless placement.
This technique is also often incorporated when making 30-35D mega volume lash fans.
How to Make Lash Fans on Tape
1. Lonely Fan Method
How to make volume fans for beginners? The answer is the lonely fan method. The lonely fan volume lashing technique is when you separate the desired number of eyelashes from the rest, repositioning and sticking them further down the strip. Using the tip of your volume tweezers, gently roll the lashes outward to form an attractive fan. It’s the easiest and most beginner-friendly approach.
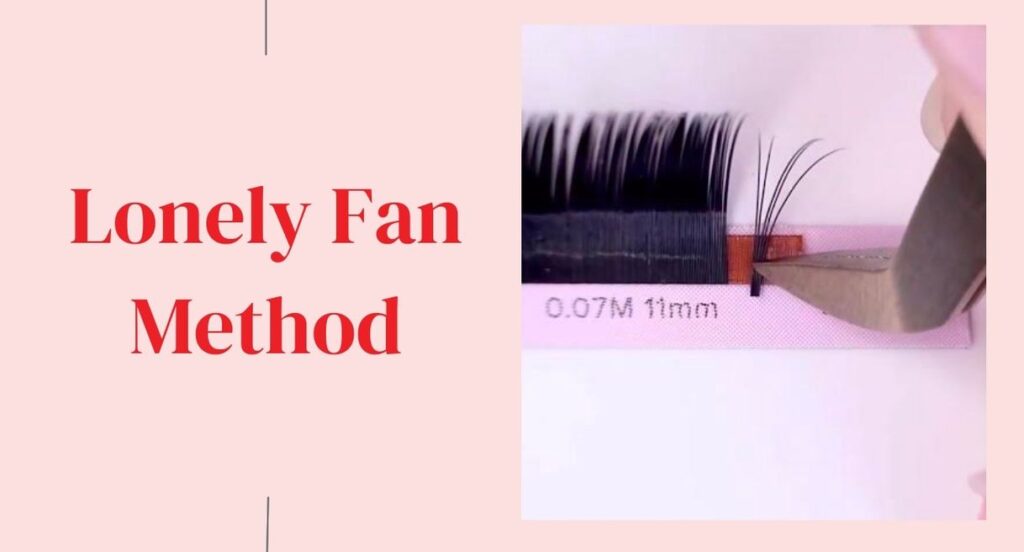
Step 1: To begin, delicately pick up the appropriate number of lashes using your tweezers. It’s crucial to ensure that the lashes are tightly collected during this step. Once you have the lashes in your grasp, carefully separate them from the strip, keeping them organized and distinct from the other lashes on the strip.
Step 2: Place them back on the strip, but make sure they are positioned away from the rest of the lashes. This arrangement allows for better control and precision during the fan-making process.
Step 3: With the point of your tweezers, gently press on the bottom of the fan to spread out the lashes. This step allows you to customize the fan to your desired volume and ensures that the lashes are equidistant from each other. Take your time during this step to achieve the perfect fan.
Step 4: Once you are satisfied with the fan’s appearance, lift it up and dip only the bottom 1 mm of the fan into glue. Be cautious not to overapply glue, as it can lead to clumping and messy application. This careful dipping ensures that the lashes are adequately secured without excess glue, resulting in a clean and professional look.
Step 5: Finally, you can either immediately apply the lash fan to the natural lashes or choose to store it for later use.
2. Wiggle Technique
In this technique, fans are placed on the tape and used with tweezers to shake them into fans. This technique is specialized for creating fans under 10D.
Step 1: Prepare Your Workspace
Begin by setting the stage for your lash artwork. Pop your lashes onto a lash palette, arranging them neatly for easy access during the application process. This step ensures a smooth and efficient workflow as you dive into creating stunning fans.
Step 2: Mastering the Grip
The best tweezer for the job is the curved tweezer. Before you start, take a moment to assess your tweezer’s grip. It’s crucial to find the perfect balance—not too stiff, not too loose. Achieving an optimal grip ensures precision and control throughout the process.
Now, locate your tweezer’s biting point—the area where it closes the tightest. This biting point will play a pivotal role in crafting flawless fans. Select your desired lash dimension (the number of lashes) and gently pull the lashes towards you, maintaining a full grip. For left-handed artists, remember to pull tight towards the left.
Step 3: Executing the Wiggle Technique
Using your ring finger, release your grip slightly while simultaneously pushing the lashes to spread them evenly. The key here is to ensure the base of the lashes is secured to the tape, facilitating an even spread.
Step 4: Lifting the Perfected Fan
As the magic unfolds, lift your fan—base first—off the strip. The careful execution of the previous steps culminates in a beautifully crafted fan, ready for application.
3. Sticky Dot Method
Step 1: Prepare the Base: Begin by placing the desired number of lashes on the sticky dot. Use a firm press at the base to ensure the lashes adhere securely.
Step 2: Perfect Placement: Place the lashes on the edge of the sticky dot and push the base of the fans firmly. This simple step is the key to creating perfectly fanned lashes.
Step 3: Lift and Dip: Once the fan is created, firmly hold and pull it off the sticky dot. Dip the base of the fan into your favorite adhesive, ensuring a strong and lasting bond.
Step 4: Watch the Magic: Witness how a voluminous fan is created within seconds. The silicone sticky dot streamlines the process, allowing you to work efficiently and with precision.
Step 5: Tweeze and Apply: Gently pick up your newly crafted volume fan with tweezers. Your handmade fans are now ready to be delicately applied to the natural lashes.
This technique is often used to create a maximum volume of 12D.
4. The Rainbow method / Rolling Technique
Step 1: Getting Ready
To start with the rolling technique, you’ll need a reliable pair of tweezers. Begin by fanning out the desired lashes partially from the strip, ensuring they remain in place.
Step 2: Creating the Perfect Fan
With the separated lashes, use the tip of your tweezers to initiate the creation of an ideal fan. The key is to use a continuous rolling motion to sculpt the lashes into a symmetrical and pleasing fan shape.
Step 3: Adjusting the Shape
Take a moment to evaluate the shape of your fan and make any necessary adjustments to ensure symmetry.
Step 4: Removing the Fan
Once satisfied with the shape, gently grab the fan near the base with your tweezers and pull it off the strip with precision.
Step 5: Applying Glue
Secure the fan by dipping the bottom millimeter into lash glue. This step ensures a secure and lasting attachment.
Step 6: Final Steps
With the fan securely glued, you’re ready to integrate it into your lash extensions, creating a seamless look. Alternatively, store the fan for later use.
While the rolling technique may be advanced, its potential for speed and precision makes it a valuable skill for lash artists. With this technique, you can create fans up to 20D. But most lash techs will often use this technique to create fans under 15D.
Best Types of Tapes for Each Technique

Here, we’ll provide details to help you better understand the functionality of each type of glue tape:
- Brown Tape (2mm): Specifically designed with a moderate bonding power for lash thicknesses of 0.03mm, 0.05mm, and 0.07mm. Ideal for lash artists creating volume and mega volume fans using pinching and flower bouquet techniques.
- Brown Tape (3mm): Stickier than the 2mm variant, suitable for lash artists employing the lonely fan (off the strip) and flower bouquet techniques. Recommended for lash thicknesses of 0.07mm, 0.085mm, and 0.10mm.
- Orange Tape (2mm): Slightly stickier than brown tape, suitable for lash artists using the lonely fan, wiggle, and rainbow methods.
- Dark Brown Tape (88Y): Offers strength without excessive stickiness, perfect for holding lashes on the strip securely. Suitable for 0.07mm and 0.085mm eyelash extensions, it serves as an alternative to yellow and green tapes.
- Green Tape (3mm): Recommended for lash artists employing the lonely fan, wiggle, and sticky dot techniques for volume application. Designed for lashes of 0.07mm, 0.085mm, and 0.1mm thicknesses, with a preference for 0.085mm and 0.01 thicknesses.
Conclusion
There you have it, lash buddies! We’ve spilled the tea on crafting killer volume lash fans, and now you’re all set to rock the lash game. Remember, it’s not about being perfect from the get-go—give yourself some room to experiment and find your groove on how to make lash fans.
So, grab your tools, crank up your favorite tunes, and let those lashes fly! Whether you’re a pro or just starting out, enjoy the journey of creating beautiful fans that make eyes pop. Happy lashing, and may your lashes be long and your days be fab!
For current and future lash artists, don’t miss:
How To Apply Under Eye Patches – Tips To Protect The Eyes Correctly
How To Remove Eyelash Extensions – 10 Professional Steps
Visit our webpage for more updated information: https://vietnamlash.com/